
Renovating your old cabinets can be a great option to update the look of your kitchen or living space without breaking the bank. It can also be an environmentally friendly option that allows you to customize your cabinets to your unique style.
Renovation Pros
Here are some reasons why you might want to consider renovating your old cabinets:
- Cost Savings: Renovating old cabinets is often more affordable than replacing them. Replacing cabinets involves removing the old ones and installing new ones, which can be time-consuming and expensive. By renovating your old cabinets, you can achieve a new look without the high costs of a whole cabinet replacement.
- Environmental Benefits: Renovating your old cabinets is also an environmentally friendly option. Reusing your existing cabinets reduces waste and the environmental impact of manufacturing new ones. Renovation can be a great option for environmentally conscious people who want to reduce their carbon footprint.
- Customization: Customizing your old cabinets through renovation lets you reflect your style. You can choose the finish, hardware, and other details based on your desires. This customization can be more difficult to achieve with new cabinets with a limited range of finishes and hardware options.
- Maintains the Layout: Renovating your old cabinets allows you to keep the existing layout of your kitchen or living space. By renovating your old cabinets, you can update the look of your space without making any significant changes.
Learn more about cabinet types
Renovation Options
Here are some methods of renovating old cabinets:
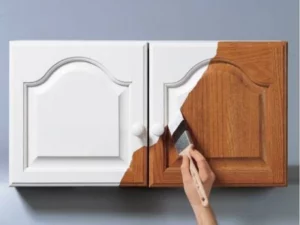
Painting Cabinets
Painting the cabinets can be an effective way to give them a fresh new look. Painting is a cost-effective option that can be done by DIY or hiring a professional painter. Consider using high-quality paint that is specially formulated for cabinets.
Here are the steps you can follow to paint your cabinets:
Step 1: Remove the Cabinet Doors and Hardware
Before painting, remove all the cabinet doors and hardware, such as knobs, handles, and hinges. Removing this extra attached hardware makes painting the cabinets easier and ensures a smooth finish.
Step 2: Clean and Sand the Cabinets
Clean the cabinets by using a degreaser to remove any dirt or grime. After cleaning, use sandpaper to roughen up the surface of the cabinets; thus, the primer can adhere to the surface better, and the paint stick better. Make sure to remove any dust or debris from the sanding before proceeding.
Step 3: Apply Primer
Primer helps to create a barrier between the old surface and the new paint. Putting the barrier helps the paint stick better and last longer. Apply the primer using a paintbrush or roller to cover all the surfaces thoroughly. Allow the primer to dry completely before proceeding.
Step 4: Sand the Cabinets Again
After the primer has dried, lightly sand the cabinets again with fine-grit sandpaper to ensure a smooth surface to the paint to adhere to.
Step 5: Apply Paint
Once the cabinets are prepped and ready, it is time to apply the paint. Use high-quality paint that is specially formulated for cabinets. You can choose from different finishes, such as satin or gloss. Apply the paint using a paintbrush or roller to cover all the surfaces thoroughly. You may need to apply more than one coat of paint to achieve the desired finish.
Step 6: Allow the Paint to Dry
Allow the paint to dry completely before proceeding to the next step. Depending on the type of paint and the humidity in your area, it can take anywhere from a few hours to overnight for the paint to dry.
Step 7: Reinstall Hardware and Doors
Once the paint is dry, reinstall the hardware and cabinet doors. Ensure they are aligned correctly and tightened properly.
Following these steps, you can successfully paint your cabinets and achieve a professional-looking finish. Taking time and patience throughout the process is important to ensure the best results.
Refacing Cabinets:
Refacing involves applying a veneer or laminate to the existing cabinet doors and drawers. It can be an affordable and quick way to update the look of your cabinets while still maintaining the basic structure and layout of your existing cabinets.
Here are the steps you can follow to reface your cabinets:
Step 1: Measure the Cabinets
Measure your existing cabinets to determine the size of the new cabinet doors and drawer fronts you must order.
Step 2: Order New Cabinet Doors and Drawer Fronts
Order new cabinet doors and drawer fronts in your desired style and finish. There are many options, including wood, laminate, and thermofoil. Make sure to order hinges and hardware that match the new doors and drawer fronts.
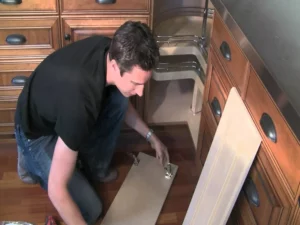
Step 3: Remove Old Cabinet Doors and Drawer Fronts
Remove the old cabinet doors, drawer fronts, and any hardware. You can use a screwdriver or drill to remove the hinges and hardware.
Step 4: Clean and Sand the Cabinets
Clean the cabinet boxes and frames using a degreaser to remove dirt or grime. After cleaning, use sandpaper to roughen up the surface of the cabinets to help the adhesive adhere to the surface sufficiently and the new finish stick better. Make sure to remove any dust or debris from the sanding before proceeding.
Step 5: Apply New Veneer or Laminate
Apply new veneer or laminate to the exposed cabinet boxes and frames. It will be better to use adhesive or pressure-sensitive veneer. Before applying, trim the veneer or laminate to the correct size and shape.
Step 6: Install New Cabinet Doors and Drawer Fronts
Install the new cabinet doors and drawer fronts using the new hardware and hinges. Make sure to align them correctly and tighten them properly.
Step 7: Install New Trim and Molding
Install new trim and molding to cover gaps or seams between the cabinet boxes and the new doors and drawer fronts to create a seamless and polished look.
Following these steps, you can successfully reface your cabinets and achieve a new look without replacing the entire cabinet. Taking time and patience throughout the process is important to ensure the best results.
Read more about affordable cabinets
Hardware Replacement:
Replacing the hardware on your cabinets can also give them a new look. Consider replacing old knobs and handles with modern options that complement your kitchen style.
Here are the steps you can follow to replace your cabinet hardware:
Step 1: Choose New Hardware
Choose new hardware in the style and finish you desire. There are many options, including knobs, pulls, and hinges. Make sure to choose hardware that fits the existing holes in your cabinets to avoid drilling new holes.
Step 2: Remove Old Hardware
Remove the old hardware from the cabinets using a screwdriver or drill. Make sure to keep any screws or other pieces that you may need later.
Step 3: Clean the Cabinets
Clean the cabinets and hardware holes using a degreaser to remove dirt or grime. Once clean, make sure to dry the area completely.
Step 4: Install New Hardware
Install the new hardware using the screws and other pieces you kept from the old hardware. Make sure to align the hardware correctly and tighten it properly.
Step 5: Check the Fit
Check the new hardware’s fit to ensure it is secure and doesn’t wiggle. If the hardware is loose, tighten it further.
By following these steps, you can easily replace the hardware on your cabinets and achieve a new look without needing a full cabinet replacement or refacing. Choosing hardware that fits your cabinets and taking time during installation is important to ensure the best results.
Cabinet Doors Replacement:
Replacing the doors of your cabinets can change the entire look of your kitchen. You can opt for custom-made doors or even prefabricated options from stores. The new doors can have a different finish or design from the original ones, improving the aesthetic appearance of the cabinets.
Here are the steps you can follow to replace your cabinet doors:
Step 1: Measure the Cabinets
Measure the height and width of the cabinet openings where the doors will be installed. Make sure to measure both the top and bottom of the opening to ensure that the opening is square.
Step 2: Choose New Cabinet Doors
Choose new cabinet doors in the style and finish you desire. There are many options, including wood, laminate, and thermofoil. Make sure to choose doors that are the correct size and match the existing cabinet boxes.
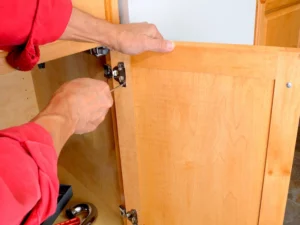
Step 3: Remove Old Cabinet Doors
Remove the old cabinet doors by unscrewing the hinges. Make sure to keep the hinges and any screws or other pieces that you may need later.
Step 4: Install New Hinges
Install new hinges on the cabinet boxes. Make sure to align the hinges correctly and use the screws that came with the new hinges.
Step 5: Install New Cabinet Doors
Install the new cabinet doors onto the hinges. Make sure to align the doors correctly and tighten the screws securely.
Step 6: Adjust the Doors
Adjust the doors to ensure that they are level and close properly. If the doors do not close properly, adjust the hinges until they do.
Step 7: Install Hardware
Install new hardware onto the doors, such as knobs or handles, using the screws with the hardware.
Glass Inserts:
You can replace the solid cabinet door panels with glass inserts for a fresh look. The glass can be frosted, etched, or stained to give the cabinets a unique touch.
Here are the steps you can follow to add glass inserts to your cabinet doors:
Step 1: Choose the Type of Glass
Choose the type of glass that you want to use for your inserts. Many options include clear, frosted, etched, or colored glass. Make sure to choose a type of glass that fits the style and decor of your kitchen or bathroom.
Step 2: Measure the Cabinet Doors
Measure the size of the cabinet doors where you want to install the glass inserts. Having precisely accurate measurements is necessary to order the right size glass.
Step 3: Order the Glass Inserts
Order the glass inserts from a local glass shop or online retailer. Make sure to order the correct size and type of glass you want.
Step 4: Remove the Cabinet Doors
Remove the cabinet doors from the hinges using a screwdriver. Make sure to keep the hinges and screws in a safe place.
Step 5: Prepare the Doors
Remove any existing center panels from the cabinet doors. If necessary, use a router or chisel to smooth the edges of the opening where the glass will be installed.
Step 6: Install the Glass Inserts
Carefully install the glass inserts into the opening. Center and secure the glass using glass clips or silicone adhesive.
Step 7: Reinstall the Cabinet Doors
Reinstall the cabinet doors onto the hinges and adjust them to ensure a proper fit. Make sure to tighten the screws securely.
Custom Shelving:
Installing custom shelving within the cabinets can increase functionality and add a unique element to your kitchen. You can also use it to store your precious items such as cups and dishes.
Here are the steps you can follow to install custom shelving for your kitchen cabinets:
Step 1: Measure the Cabinet Space
Measure the interior of your kitchen cabinets to determine the width, depth, and height of the space where you want to install the custom shelving. Make sure to measure accurately and record the measurements.
Step 2: Choose Your Materials
Choose the materials you want for your custom shelves, such as wood, metal, or plastic. Consider the weight of the items you will store on the shelves and choose materials that can support the weight.
Step 3: Cut the Shelves to Size
Cut the shelves to the correct size using a saw or other cutting tool. Make sure to wear safety equipment and measure carefully to ensure accurate cuts.
Step 4: Install Shelf Supports
Install the shelf supports onto the sides of the cabinet using a drill and screws. Make sure to install the supports securely and at the correct height for your shelves.
Step 5: Attach the Shelves to the Supports
Attach the shelves to the supports using screws or other hardware. Make sure to align the shelves correctly and use the appropriate hardware for your type of shelves.
Step 6: Add Finishing Touches
Add finishing touches, such as trim or paint, to complete the look of your custom shelves. This step is optional but can help to improve the overall appearance of your shelving.
Step 7: Test the Shelves
Test the shelves by placing items on them and ensuring they support the weight. Make any necessary adjustments to the shelf supports or shelves to ensure proper support.
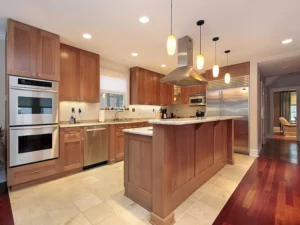
Kitchen Remodeling
kitchen cabinet renovation is an excellent way to transform the look and feel of your kitchen, increase its functionality, and cut costs simultaneously. It involves updating your cabinets by replacing or refinishing the doors, drawers, and hardware. You can create a design that suits your tastes by choosing new finishes, colors, and styles. It can also add value to your home if you plan to sell it. It is an investment that pays off in both authenticity and functionality. So, if you are looking for an affordable way to update your home’s interior design, consider cabinet renovation as an option.
KEYWORDS: